
Build DIY Closet Shelves That Fit Your Space and Budget
You can build sturdy, custom closet shelves with 3/4-inch plywoodYou can build sturdy, custom closet shelves with 3/4-inch plywood, MDF, melamine, or solid wood, then support them with wall cleats or brackets fastened directly into studs. For a reliable closet shelves DIY project, measure the closet at the top, middle, and floor, use the smallest measurement for your cuts, and keep unsupported 3/4-inch shelf spans under about 32 inches or add a center support.
DIY shelves solve problems that store-bought kits often cannot: odd corners, wasted vertical space, shallow closets, and a mix of hanging clothes, shoes, and folded items. They can also cost far less than a custom installation. A simple material build may be around $200, while a more finished plywood system with rods, edge banding, and hardware can land closer to $300.
I am Chris Johnson, owner of Johnson Closet Co. I have spent more than 30 years designing, building, and installing storage systems, and I have seen how a well-planned closet shelves DIY project can make a cluttered wardrobe easier to use every day.
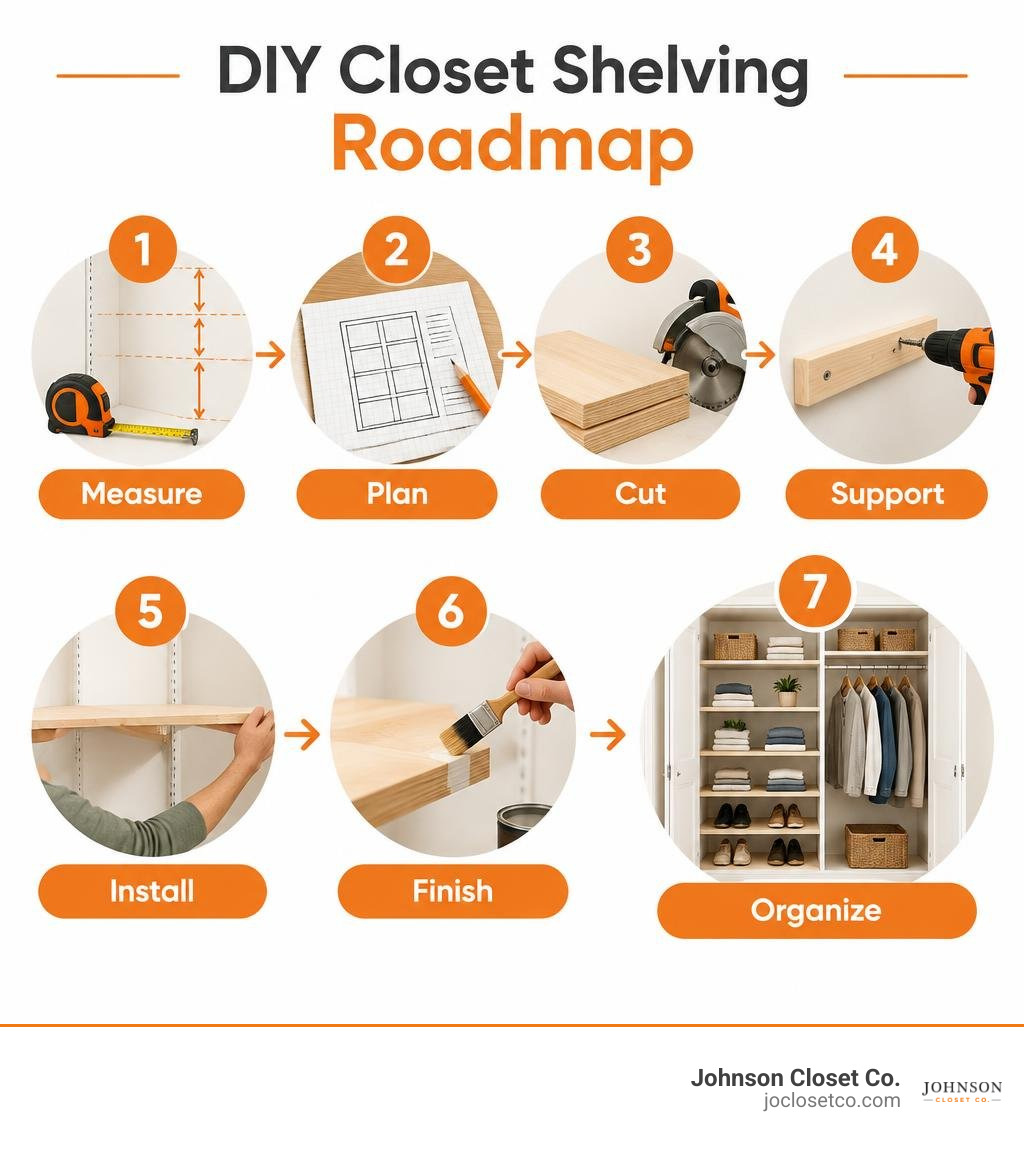
Planning and Materials for Closet Shelves DIY
When planning custom storage, the goal is balancing durability, ease of assembly, and total cost. Off-the-shelf wire racks often leave unsightly ridges on knitwear and drop small items onto the floor. Building your own system allows you to adapt the shelving depth to your wardrobe while making sure every vertical inch is utilized.
A thorough planning phase prevents the classic DIY headache: discovering halfway through assembly that your closet walls taper inward by half an inch, or that your longest shelf sags under a stack of winter coats.
Choosing the Right Wood and Sheet Materials
Selecting your core sheet material dictates your tool requirements, finishing workflow, and long-term shelf performance.
| Material | Cost per Sheet (4x8) | Durability | Screw-Holding Strength | Finishing Required | Best Use Case |
|---|---|---|---|---|---|
| Prefinished Plywood (3/4") | $80 – $90 | High | Excellent | Minimal (Edge Banding only) | Heavy-duty clothing towers, long spans |
| Melamine Particleboard (3/4") | $50 – $55 | Moderate | Fair (Prone to blowouts) | Edge Banding only | Budget-conscious reach-ins, easy wipe-downs |
| Medium-Density Fiberboard (MDF, 3/4") | $45 – $60 | Moderate | Moderate | High (Primer + Paint) | Painted built-ins, short decorative spans |
| Solid Pine / Whitewood (1x12) | $15 – $25 / board | Moderate | Good | Moderate (Stain or Paint) | Rustic closets, freestanding dowel builds |
Prefinished maple plywood provides exceptional structural rigidity and clean surfaces right out of the store. Melamine particleboard offers an affordable, pre-laminated surface that wipes clean easily, though it requires sharp blades to avoid edge chipping. Medium-density fiberboard (MDF) paints smoothly, but spans over 28 inches require stiffener cleats underneath to prevent sagging.
If you are exploring different lumber species or grain orientations, reviewing wood selection techniques will help you choose boards that stay straight and true over time.
Measuring Closet Dimensions and Calculating Load Spans
No closet built with drywall and framing lumber is perfectly square. Measure the width of your back wall at three specific elevations: near the floor, at mid-height (around 48 inches), and near the ceiling line (around 84 inches). Always use the narrowest measurement when calculating cut lengths for full-width horizontal shelves.
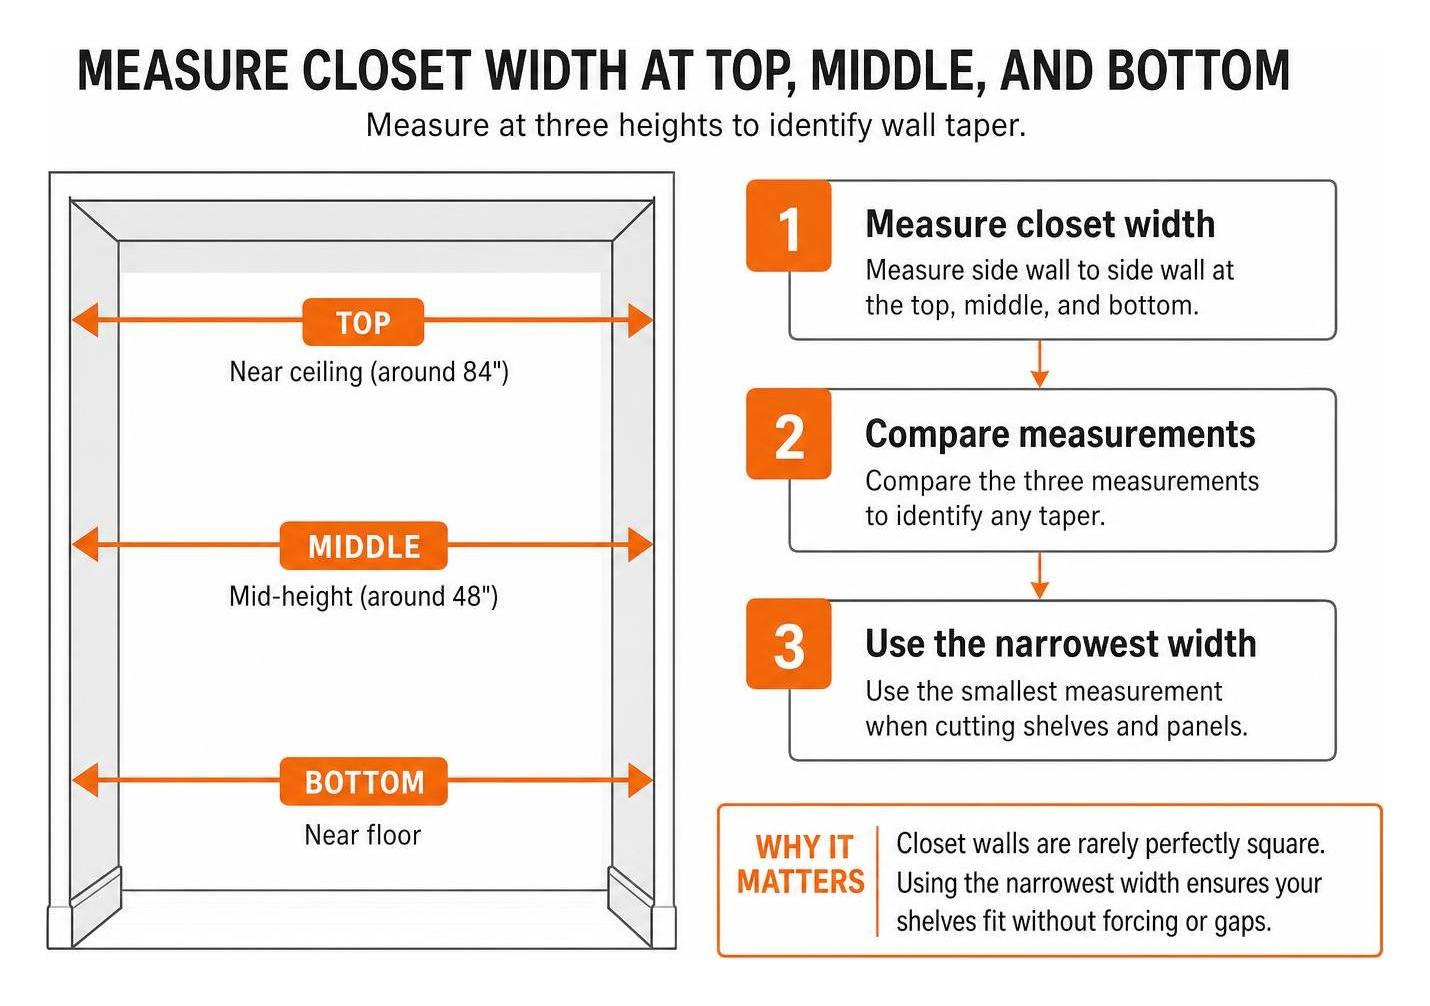
When establishing your shelf layout, structural spans determine long-term stability:
- Maximum Unsupported Span: Standard 3/4-inch plywood or melamine shelves carrying folded clothes or linens should not exceed a 32-inch span without intermediate support.
- Support Deductions: When using 3/4-inch side cleats to support a back-wall shelf, remember to deduct 1-1/2 inches from the total back-wall shelf width so the piece drops cleanly into place.
- Vertical Spacing: Allow 10 to 12 inches of vertical clearance between shelves for folded t-shirts, shoes, and storage bins, while reserving 14 to 16 inches for bulkier bedding or storage totes.
For an in-depth breakdown of standard closet heights, hanging zone depths, and space allocations, our guide to custom closet design principles covers proven layout formulas.
Essential Tools and Preparation Steps
Having your tools arranged and materials staged before making your first cut keeps your project organized and on track over a weekend build.
Must-Have Tools vs. Equipment to Rent
You can build a professional-grade closet build with straightforward tools:
- Drill / Driver and Bits: A reliable cordless drill for boring countersunk pilot holes and driving structural fasteners.
- Stud Finder: Essential for identifying framing members hidden behind drywall.
- 4-Foot Level: Critical for leveling horizontal support cleats across long back walls.
- Pocket Hole Jig: Ideal for assembling rigid central shelf towers without visible exterior screw heads.
- Circular Saw with Edge Guide: Cuts down 4x8 sheet goods accurately. If you prefer furniture-grade cuts without splintering, renting a track saw for a day provides pristine edges.
- Miter Saw (Optional): Speeds up repeatable 90-degree cuts on 1x4 support cleats and hanging rods.
Pre-Cutting and Sourcing Your Shelf Boards

Before breaking down full sheets of plywood or melamine, map out your cuts on paper to account for blade kerf (the 1/8-inch material turned into sawdust with each pass). If transporting 4x8 sheets from the home improvement center is tricky, have the lumber yard make primary rip cuts down the length of the boards to standard shelf depths of 12, 14, or 16 inches.
For projects requiring precise factory-squared edges, ordering custom shelf boards cut to size eliminates the need to manage heavy sheet goods at home.
Step-by-Step Installation for Custom Storage
Once your boards are cut, sanded, and staged, you can begin the physical installation.
Installing Wall Cleats and Framing for Closet Shelves DIY
Horizontal wall cleats provide a continuous, rigid ledger for your shelves to rest upon.
- Locate and Mark Studs: Use your stud finder along the closet walls. Mark the center of every stud along the line where your shelf will sit.
- Cut Cleats to Size: Cut 1x4 pine or 3/4-inch plywood strips to match the back and side wall boundaries.
- Level and Fasten: Hold your back cleat against the wall, check it with your 4-foot level, and secure it into each wall stud using 3-inch #8 or #10 structural cabinet screws.
- Attach Side Ledgers: Install side cleats flush with the back cleat to provide balanced, perimeter support.
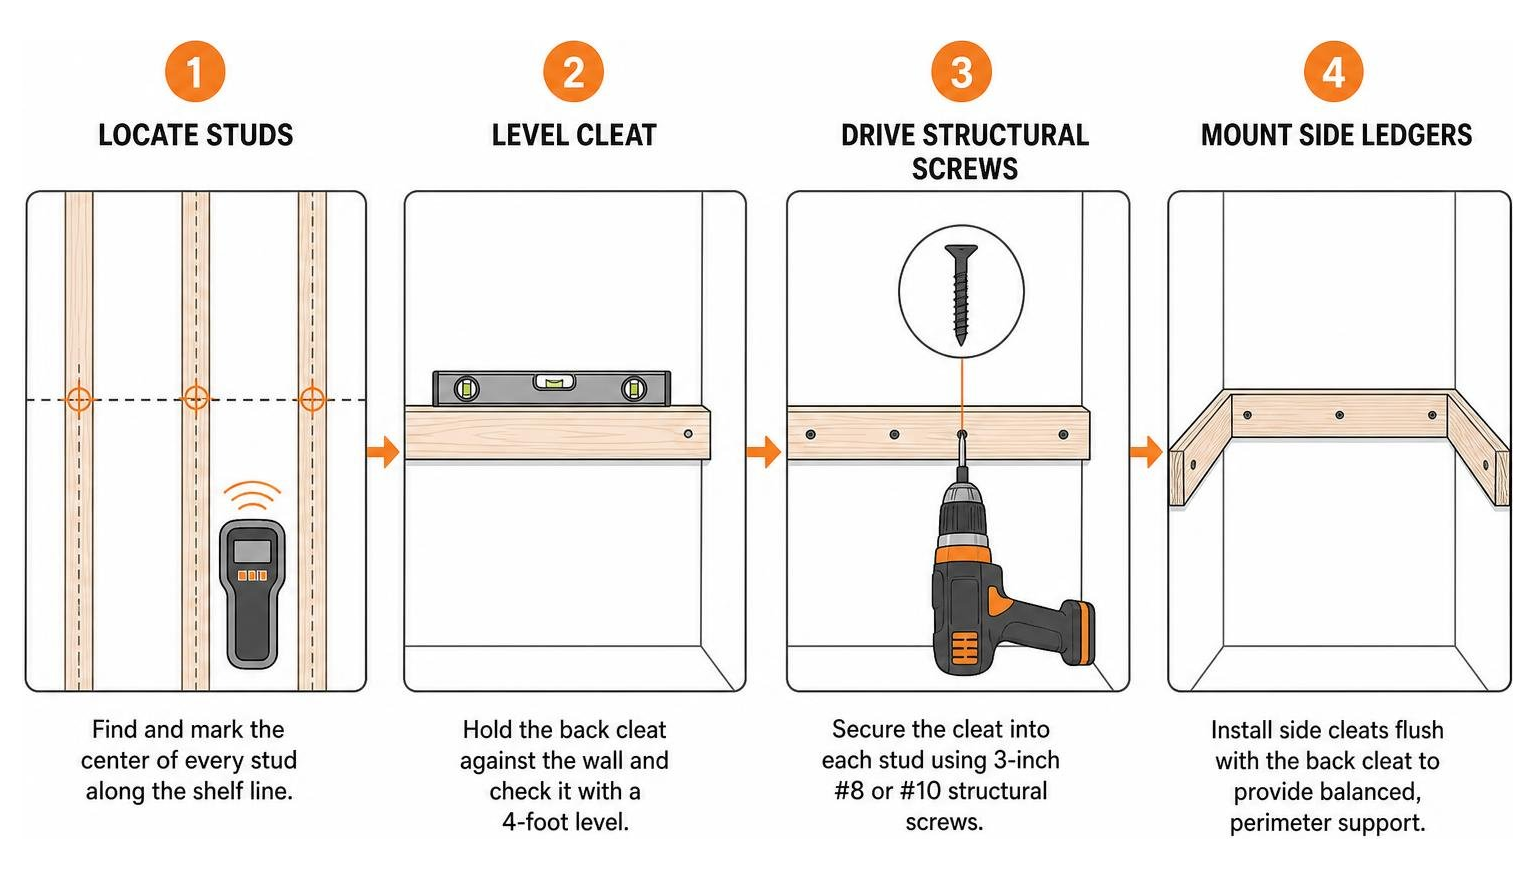
A secure wall-cleat foundation prevents sagging and ensures that your wall-mounted closet shelving remains rock-solid under heavy loads.
Assembling the Shelf Tower and Support Brackets
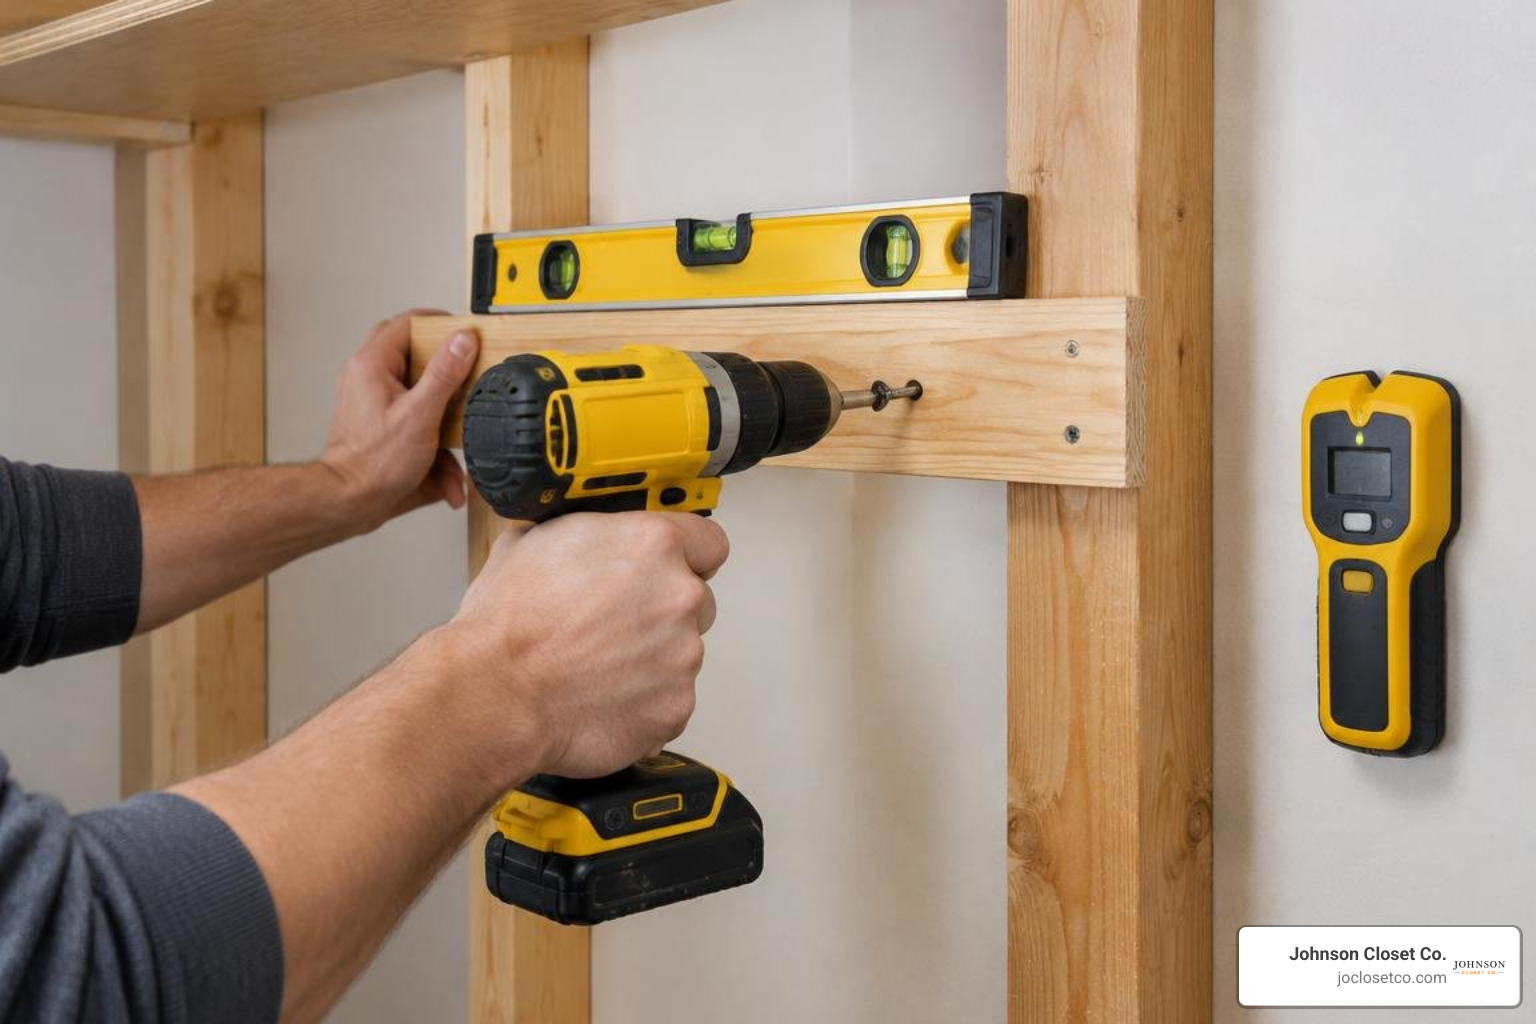
A central vertical tower divides your closet into functional zones, separating short-hanging items from long garments and folded stacks.
- Build the tower box using two vertical 3/4-inch plywood sides joined by top, bottom, and fixed intermediate shelves.
- Use pocket hole joinery with 1-1/4-inch coarse-thread pocket screws on the undersides of shelves to hide fasteners from eye level.
- Anchor the central tower directly to the back wall studs or top cleat to prevent forward tipping.
- For long side spans connecting the tower to the outer closet wall, reinforce joints with heavy-duty metal L-brackets tucked beneath the shelf lip.
If you are designing standalone vertical cubbies, combining modular 3 shelf closet organizer units provides dedicated space for folded garments, shoes, and accessory baskets.
Adding Hanging Rods and Integrated Storage Features
A functional wardrobe configuration incorporates both upper and lower hanging zones alongside shelf storage.
- Heavy-Duty Steel Rods: 1-5/16-inch chrome or powder-coated steel rods resist bowing across spans up to 48 inches. Fasten the rod sockets directly through wall cleats into studs.
- Industrial Pipe Fixtures: Threaded 3/4-inch black iron pipes paired with floor flanges offer a rugged look and support substantial coat weights.
- Dual-Height Layout: Place your upper hanging rod at 80 to 84 inches from the floor for tops, shirts, and folded trousers, and install a lower rod at 40 to 42 inches. Reserve one vertical section (60 to 66 inches) for dresses, long coats, or formal wear.
DIYers interested in standalone systems can also review freestanding wood closet plans for frame-supported clothing racks and shoe towers.
Finishing Touches and Small-Space Hacks
The difference between a makeshift carpentry project and a tailored built-in comes down to the finishing details.
Edge Banding, Caulking, and Painting Techniques for Closet Shelves DIY
Exposed plywood edges and rough MDF borders can catch on delicate fabrics. Applying iron-on edge banding seals these porous cuts and creates a clean, uniform profile.
- Apply Edge Banding: Center pre-glued veneer or PVC edge tape over the exposed shelf edge. Run a household iron set to medium-high heat slowly along the strip to activate the adhesive.
- Press and Cool: Firmly burnish the hot tape with a wood block to ensure complete adhesion, then let it cool for 5 minutes.
- Trim Excess: Use an edge-banding trimmer or a fresh utility knife blade tilted at a 45-degree angle to slice away excess banding flush with the board face.
- Caulk Wall Seams: Run a thin bead of paintable acrylic latex caulk along the joints where wood cleats meet the drywall. Smooth the bead with a damp finger.
- Prime and Paint: Apply a shellac-based primer over raw MDF edges or knotty pine to seal the grain, then finish with two coats of semi-gloss or satin interior enamel.
Maximizing Awkward Corners and Narrow Closets
Reach-in closets often have inaccessible dead zones behind wall returns. You can reclaim this hidden space with tailored corner shelving:
- Paper Templates: If your closet corner is out of square, lay a sheet of stiff kraft paper across the ledger cleats, crease the exact perimeter lines against the drywall, and use that sheet as your cut template.
- L-Shaped Corner Shelving: Join two shelf boards at a 90-degree angle using pocket screws or a half-lap joint supported by continuous perimeter cleats.
- Peg Rails and Accessory Hooks: Install a shallow 1x3 hardwood strip fitted with shaker pegs on narrow end walls to hold belts, scarves, bags, and hats.
For more layout inspiration across challenging spaces, browse our strategies for wardrobe and closet organization.
Common Mistakes to Avoid and Cost Breakdown
Building custom storage is straightforward, but avoiding these frequent missteps will keep your project running smoothly.
Critical Beginner Mistakes and Quick Fixes
- Skipping Pilot Holes: Driving screws near the edges of plywood or melamine without pre-drilling can split the wood. Always drill a pilot hole slightly smaller than the screw shank with a countersink bit.
- Ignoring Wall Bows: Drywall mud often builds up in corners, making the corner narrower than the center wall. Always scribe boards to fit irregular profiles rather than forcing tight cuts.
- Overloading Long Spans: Never span more than 32 inches without an intermediate cleat, vertical divider, or support bracket.
- Fastening Only to Drywall: Hollow drywall anchors will eventually pull loose under heavy clothing loads. Fasten all primary weight-bearing cleats directly into solid wall studs with 3-inch screws.
To see step-by-step fastening methods and anchor standards, review our comprehensive closet system installation techniques.
Cost Analysis: DIY Shelving vs. Professional Systems
Building your own storage system delivers significant savings compared to custom-built alternatives.
A standard 6-to-8-foot reach-in closet built with two sheets of 3/4-inch prefinished maple ($172), pine cleats ($11), three steel rods with hardware ($34), edge banding ($19), and structural screws ($31) totals roughly $267 in materials.
This represents significant savings compared to custom millwork quotes, while delivering a custom-tailored configuration. For smaller spaces, a modular 36 inch closet organizer layout offers an efficient, budget-friendly template.
Frequently Asked Questions About Closet Shelves DIY
What is the cheapest material for DIY closet shelves?
Melamine-faced particleboard is typically the most economical option, averaging $50 to $55 per 4x8 sheet. It offers a pre-finished white surface that eliminates the need for painting, making it a budget-friendly option when shelves stay supported within safe spans.
How wide can a DIY closet shelf span without sagging?
For standard 3/4-inch plywood, MDF, or melamine boards carrying clothing, linens, or shoes, the maximum recommended unsupported span is 32 inches. For spans exceeding 32 inches, install a center vertical support, an intermediate heavy-duty wall bracket, or a 1x2 hardwood stiffener glued beneath the front edge.
Can I build custom closet shelves without a table saw?
Yes. You can build an entire closet storage build using a standard circular saw paired with a clamped straight edge, a track saw guide, or by having your local lumber yard make primary rip cuts to width when purchasing sheet goods.
Conclusion
Building your own closet shelving transforms a cluttered reach-in or walk-in into an organized, efficient dressing space. With basic tools, a sheet of quality plywood, level wall cleats, and careful measurements, you can create a sturdy storage solution tailored to your exact wardrobe needs for a fraction of the cost of custom installations.
If your project involves complex wall angles, ceiling drop-downs, or you want high-capacity drawers, precision adjustable shelf pins, and seamless finishes without spending your weekends cutting sheet goods, our team at Johnson Closet Co. is here to help. Serving homeowners throughout the Phoenix Valley—including Scottsdale, Gilbert, Chandler, Mesa, and Tempe—we manufacture custom closets, garage cabinets, and built-ins using precision CNC equipment for an exact, tailored fit.
Explore our design gallery to learn more about deep storage options and 24-inch deep closet shelves to maximize your home storage today., MDF, melamine, or solid wood, then support them with wall cleats or brackets fastened directly into studs. For a reliable closet shelves DIY project, measure the closet at the top, middle, and floor, use the smallest measurement for your cuts, and keep unsupported 3/4-inch shelf spans under about 32 inches or add a center support.
DIY shelves solve problems that store-bought kits often cannot: odd corners, wasted vertical space, shallow closets, and a mix of hanging clothes, shoes, and folded items. They can also cost far less than a custom installation. A simple material build may be around $200, while a more finished plywood system with rods, edge banding, and hardware can land closer to $300.
I am Chris Johnson, owner of Johnson Closet Co. I have spent more than 30 years designing, building, and installing storage systems, and I have seen how a well-planned closet shelves DIY project can make a cluttered wardrobe easier to use every day.
Planning and Materials for Closet Shelves DIY
When planning custom storage, the goal is balancing durability, ease of assembly, and total cost. Off-the-shelf wire racks often leave unsightly ridges on knitwear and drop small items onto the floor. Building your own system allows you to adapt the shelving depth to your wardrobe while making sure every vertical inch is utilized.
A thorough planning phase prevents the classic DIY headache: discovering halfway through assembly that your closet walls taper inward by half an inch, or that your longest shelf sags under a stack of winter coats.
Choosing the Right Wood and Sheet Materials
Selecting your core sheet material dictates your tool requirements, finishing workflow, and long-term shelf performance.
| Material | Cost per Sheet (4x8) | Durability | Screw-Holding Strength | Finishing Required | Best Use Case |
|---|---|---|---|---|---|
| Prefinished Plywood (3/4") | $80 – $90 | High | Excellent | Minimal (Edge Banding only) | Heavy-duty clothing towers, long spans |
| Melamine Particleboard (3/4") | $50 – $55 | Moderate | Fair (Prone to blowouts) | Edge Banding only | Budget-conscious reach-ins, easy wipe-downs |
| Medium-Density Fiberboard (MDF, 3/4") | $45 – $60 | Moderate | Moderate | High (Primer + Paint) | Painted built-ins, short decorative spans |
| Solid Pine / Whitewood (1x12) | $15 – $25 / board | Moderate | Good | Moderate (Stain or Paint) | Rustic closets, freestanding dowel builds |
Prefinished maple plywood provides exceptional structural rigidity and clean surfaces right out of the store. Melamine particleboard offers an affordable, pre-laminated surface that wipes clean easily, though it requires sharp blades to avoid edge chipping. Medium-density fiberboard (MDF) paints smoothly, but spans over 28 inches require stiffener cleats underneath to prevent sagging.
If you are exploring different lumber species or grain orientations, reviewing wood selection techniques will help you choose boards that stay straight and true over time.
Measuring Closet Dimensions and Calculating Load Spans
No closet built with drywall and framing lumber is perfectly square. Measure the width of your back wall at three specific elevations: near the floor, at mid-height (around 48 inches), and near the ceiling line (around 84 inches). Always use the narrowest measurement when calculating cut lengths for full-width horizontal shelves.
When establishing your shelf layout, structural spans determine long-term stability:
- Maximum Unsupported Span: Standard 3/4-inch plywood or melamine shelves carrying folded clothes or linens should not exceed a 32-inch span without intermediate support.
- Support Deductions: When using 3/4-inch side cleats to support a back-wall shelf, remember to deduct 1-1/2 inches from the total back-wall shelf width so the piece drops cleanly into place.
- Vertical Spacing: Allow 10 to 12 inches of vertical clearance between shelves for folded t-shirts, shoes, and storage bins, while reserving 14 to 16 inches for bulkier bedding or storage totes.
For an in-depth breakdown of standard closet heights, hanging zone depths, and space allocations, our guide to custom closet design principles covers proven layout formulas.
Essential Tools and Preparation Steps
Having your tools arranged and materials staged before making your first cut keeps your project organized and on track over a weekend build.
Must-Have Tools vs. Equipment to Rent
You can build a professional-grade closet build with straightforward tools:
- Drill / Driver and Bits: A reliable cordless drill for boring countersunk pilot holes and driving structural fasteners.
- Stud Finder: Essential for identifying framing members hidden behind drywall.
- 4-Foot Level: Critical for leveling horizontal support cleats across long back walls.
- Pocket Hole Jig: Ideal for assembling rigid central shelf towers without visible exterior screw heads.
- Circular Saw with Edge Guide: Cuts down 4x8 sheet goods accurately. If you prefer furniture-grade cuts without splintering, renting a track saw for a day provides pristine edges.
- Miter Saw (Optional): Speeds up repeatable 90-degree cuts on 1x4 support cleats and hanging rods.
Pre-Cutting and Sourcing Your Shelf Boards
Before breaking down full sheets of plywood or melamine, map out your cuts on paper to account for blade kerf (the 1/8-inch material turned into sawdust with each pass). If transporting 4x8 sheets from the home improvement center is tricky, have the lumber yard make primary rip cuts down the length of the boards to standard shelf depths of 12, 14, or 16 inches.
For projects requiring precise factory-squared edges, ordering custom shelf boards cut to size eliminates the need to manage heavy sheet goods at home.
Step-by-Step Installation for Custom Storage
Once your boards are cut, sanded, and staged, you can begin the physical installation.
Installing Wall Cleats and Framing for Closet Shelves DIY
Horizontal wall cleats provide a continuous, rigid ledger for your shelves to rest upon.
- Locate and Mark Studs: Use your stud finder along the closet walls. Mark the center of every stud along the line where your shelf will sit.
- Cut Cleats to Size: Cut 1x4 pine or 3/4-inch plywood strips to match the back and side wall boundaries.
- Level and Fasten: Hold your back cleat against the wall, check it with your 4-foot level, and secure it into each wall stud using 3-inch #8 or #10 structural cabinet screws.
- Attach Side Ledgers: Install side cleats flush with the back cleat to provide balanced, perimeter support.
A secure wall-cleat foundation prevents sagging and ensures that your wall-mounted closet shelving remains rock-solid under heavy loads.
Assembling the Shelf Tower and Support Brackets
A central vertical tower divides your closet into functional zones, separating short-hanging items from long garments and folded stacks.
- Build the tower box using two vertical 3/4-inch plywood sides joined by top, bottom, and fixed intermediate shelves.
- Use pocket hole joinery with 1-1/4-inch coarse-thread pocket screws on the undersides of shelves to hide fasteners from eye level.
- Anchor the central tower directly to the back wall studs or top cleat to prevent forward tipping.
- For long side spans connecting the tower to the outer closet wall, reinforce joints with heavy-duty metal L-brackets tucked beneath the shelf lip.
If you are designing standalone vertical cubbies, combining modular 3 shelf closet organizer units provides dedicated space for folded garments, shoes, and accessory baskets.
Adding Hanging Rods and Integrated Storage Features
A functional wardrobe configuration incorporates both upper and lower hanging zones alongside shelf storage.
- Heavy-Duty Steel Rods: 1-5/16-inch chrome or powder-coated steel rods resist bowing across spans up to 48 inches. Fasten the rod sockets directly through wall cleats into studs.
- Industrial Pipe Fixtures: Threaded 3/4-inch black iron pipes paired with floor flanges offer a rugged look and support substantial coat weights.
- Dual-Height Layout: Place your upper hanging rod at 80 to 84 inches from the floor for tops, shirts, and folded trousers, and install a lower rod at 40 to 42 inches. Reserve one vertical section (60 to 66 inches) for dresses, long coats, or formal wear.
DIYers interested in standalone systems can also review freestanding wood closet plans for frame-supported clothing racks and shoe towers.
Finishing Touches and Small-Space Hacks
The difference between a makeshift carpentry project and a tailored built-in comes down to the finishing details.
Edge Banding, Caulking, and Painting Techniques for Closet Shelves DIY
Exposed plywood edges and rough MDF borders can catch on delicate fabrics. Applying iron-on edge banding seals these porous cuts and creates a clean, uniform profile.
- Apply Edge Banding: Center pre-glued veneer or PVC edge tape over the exposed shelf edge. Run a household iron set to medium-high heat slowly along the strip to activate the adhesive.
- Press and Cool: Firmly burnish the hot tape with a wood block to ensure complete adhesion, then let it cool for 5 minutes.
- Trim Excess: Use an edge-banding trimmer or a fresh utility knife blade tilted at a 45-degree angle to slice away excess banding flush with the board face.
- Caulk Wall Seams: Run a thin bead of paintable acrylic latex caulk along the joints where wood cleats meet the drywall. Smooth the bead with a damp finger.
- Prime and Paint: Apply a shellac-based primer over raw MDF edges or knotty pine to seal the grain, then finish with two coats of semi-gloss or satin interior enamel.
Maximizing Awkward Corners and Narrow Closets
Reach-in closets often have inaccessible dead zones behind wall returns. You can reclaim this hidden space with tailored corner shelving:
- Paper Templates: If your closet corner is out of square, lay a sheet of stiff kraft paper across the ledger cleats, crease the exact perimeter lines against the drywall, and use that sheet as your cut template.
- L-Shaped Corner Shelving: Join two shelf boards at a 90-degree angle using pocket screws or a half-lap joint supported by continuous perimeter cleats.
- Peg Rails and Accessory Hooks: Install a shallow 1x3 hardwood strip fitted with shaker pegs on narrow end walls to hold belts, scarves, bags, and hats.
For more layout inspiration across challenging spaces, browse our strategies for wardrobe and closet organization.
Common Mistakes to Avoid and Cost Breakdown
Building custom storage is straightforward, but avoiding these frequent missteps will keep your project running smoothly.
Critical Beginner Mistakes and Quick Fixes
- Skipping Pilot Holes: Driving screws near the edges of plywood or melamine without pre-drilling can split the wood. Always drill a pilot hole slightly smaller than the screw shank with a countersink bit.
- Ignoring Wall Bows: Drywall mud often builds up in corners, making the corner narrower than the center wall. Always scribe boards to fit irregular profiles rather than forcing tight cuts.
- Overloading Long Spans: Never span more than 32 inches without an intermediate cleat, vertical divider, or support bracket.
- Fastening Only to Drywall: Hollow drywall anchors will eventually pull loose under heavy clothing loads. Fasten all primary weight-bearing cleats directly into solid wall studs with 3-inch screws.
To see step-by-step fastening methods and anchor standards, review our comprehensive closet system installation techniques.
Cost Analysis: DIY Shelving vs. Professional Systems
Building your own storage system delivers significant savings compared to custom-built alternatives.
A standard 6-to-8-foot reach-in closet built with two sheets of 3/4-inch prefinished maple ($172), pine cleats ($11), three steel rods with hardware ($34), edge banding ($19), and structural screws ($31) totals roughly $267 in materials.
This represents significant savings compared to custom millwork quotes, while delivering a custom-tailored configuration. For smaller spaces, a modular 36 inch closet organizer layout offers an efficient, budget-friendly template.
Frequently Asked Questions About Closet Shelves DIY
What is the cheapest material for DIY closet shelves?
Melamine-faced particleboard is typically the most economical option, averaging $50 to $55 per 4x8 sheet. It offers a pre-finished white surface that eliminates the need for painting, making it a budget-friendly option when shelves stay supported within safe spans.
How wide can a DIY closet shelf span without sagging?
For standard 3/4-inch plywood, MDF, or melamine boards carrying clothing, linens, or shoes, the maximum recommended unsupported span is 32 inches. For spans exceeding 32 inches, install a center vertical support, an intermediate heavy-duty wall bracket, or a 1x2 hardwood stiffener glued beneath the front edge.
Can I build custom closet shelves without a table saw?
Yes. You can build an entire closet storage build using a standard circular saw paired with a clamped straight edge, a track saw guide, or by having your local lumber yard make primary rip cuts to width when purchasing sheet goods.
Conclusion
Building your own closet shelving transforms a cluttered reach-in or walk-in into an organized, efficient dressing space. With basic tools, a sheet of quality plywood, level wall cleats, and careful measurements, you can create a sturdy storage solution tailored to your exact wardrobe needs for a fraction of the cost of custom installations.
If your project involves complex wall angles, ceiling drop-downs, or you want high-capacity drawers, precision adjustable shelf pins, and seamless finishes without spending your weekends cutting sheet goods, our team at Johnson Closet Co. is here to help. Serving homeowners throughout the Phoenix Valley—including Scottsdale, Gilbert, Chandler, Mesa, and Tempe—we manufacture custom closets, garage cabinets, and built-ins using precision CNC equipment for an exact, tailored fit.
Explore our design gallery to learn more about deep storage options and 24-inch deep closet shelves to maximize your home storage today.